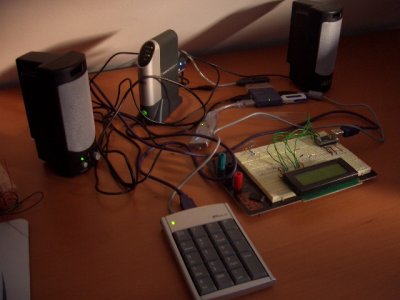
This page describes how I've solved the problem of adding an interactive terminal to my Linksys NSLU2 (aka Slug) with a USB keyboard and an LCD display. My solution consists of some C++ code (about 1000 lines) and some hardware to attach the display to USB. I hope that it will be useful to other Slug users.
My Slug runs Debian GNU/Linux. I don't have a native compilation environment installed and this page describes how to cross-compile from a Linux PC. Native compilation should be simpler but slower. It should also be possible to do all this on OpenEmbedded systems (i.e. OpenSlug) and other platforms, but I can't help much with that.
All of this code will also run natively on a Linux PC, and I did most of the development that way before cross-compiling to the Slug.
This page first describes the software-only USB keyboard setup, then the hardware and software for the LCD display, and finally shows how it is all joined up to create the terminal. The system is reasonably well partitioned so if you just want a keyboard or just want a display you should be able to make some use of this material. On the other hand, if you just want to reproduce the terminal as I have built it you can skip the details of the software structure.
This page assumes a fair level of Linux expertise. If you have never compiled a C program or looked in /proc/bus/usb or /lib/modules before then this is probably not the best place to start. On the other hand the level of hardware expertise required is quite minimal, depending on how closely you follow my design.
Feedback, patches, success stories, spelling corrections etc. all gratefully received. There is a feedback link at the bottom of the page.
Latest news - SlugTerm now has a box!
You can get my SlugTerm source code using subversion as follows. (If you don't have subversion yet, install it first.)
$ svn co http://svn.chezphil.org/slugterm/trunk slugterm
This will get the latest version of the code and put it in a directory called slugterm. I may get around to tagged version numbers at some point in the future but they don't exist yet.
You also need four files from my utility library, libpbe. The build system is not very well set up for this at present so I suggest that you get the libpbe source from subversion and just copy the required files over, as follows. I'll try to sort this out properly at some point.
$ svn co -r 2261 http://svn.chezphil.org/libpbe/trunk libpbe
$ cd libpbe/src
$ cp select.hh select.cc Exception.hh Exception.cc ../../slugterm/src
That gets libpbe at subversion revison 2261, which is contemporary with the last changes to the slugterm code. I have since made various minor but incompatible changes to libpbe.
My code is licensed under the terms of the GNU GPL. Please respect the terms of this license; if you want to use the code in some other way, please get in touch.
If you're going to buy a keyboard specifically for your Slug you could get a miniature one like mine. I wouldn't particularly recommend it though; although they look good alongside a slug they are awful to type on.
Getting characters out of the USB keyboard was more difficult than I thought it should have been. It seems that within the kernel the USB drivers deliver keycodes, not character codes, to the console driver. Keycode to character code conversion is done within the console driver, which isn't present on a Slug, and even if it were present it wouldn't be possible to get at the data stream. (Any kernel hackers who believe differently, please get in touch.)
So instead my userland code has to do the keycode to character code conversion, which involves describing the layout of the keyboard and keeping track of which mofifier keys (shift, ctrl etc) are pressed. I have not dealt with the caps (and other) lock keys and their LEDs.
The source of keycodes is /dev/input/eventn where n is probably 0 unless you've plugged in multiple keyboards or mice. The device node will probably appear automatically if you're using udev; if not try MAKEDEV input. The evdev, usbhid (and input?) kernel modules should also be loaded automatically. You can test it with od -x /dev/input/event0; you should get a few lines of output for each keypress.
My USB keyboard driver code is in UsbKeyboard.cc. This reads events from the device and extracts the keycode and press/release information. KeyboardLayout.hh defines a base class for keyboard layout definitions, of which UkKeyboardLayout is at present the only example. You could easily write your own based on this and the info from /usr/share/keymaps or the X equivalent. UsbKeyboard uses the KeyboardLayout to look up the character code for the current keycode and modifiers.
If you want to use UsbKeyboard in your own code you just need to pass the pathname of the event device file and a KeyboardLayout object as parameters to its constructor. It also takes a function pointer for a callback to which it delivers character codes when keys are pressed. Call the run() method, presumably in its own thread, to start it going. Here's an example. You can find this example, as well as all of the others on this page, in the examples directory of the source distribution.
// Example use of UsbKeyboard

#include "UsbKeyboard.hh"
#include "UkKeyboardLayout.hh"

#include <string>
#include <iostream>

using namespace std;


UkKeyboardLayout uk_keyboard_layout;

void process_char(string s)
{
  cout << "You pressed '" << s << "'\n";
}

int main(int argc, char* argv[])
{
  UsbKeyboard keyboard ( "/dev/input/event0",
                         uk_keyboard_layout,
                         process_char );

  keyboard.run();
}
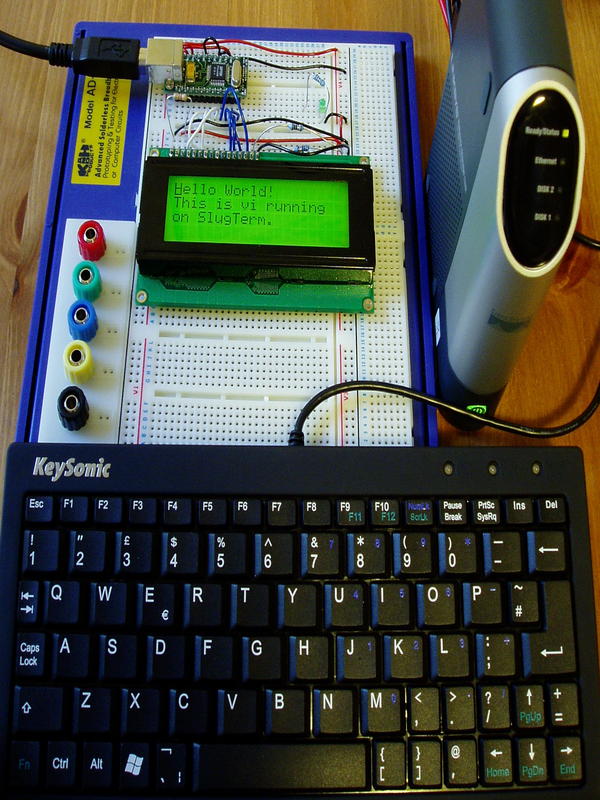
I have used a DLP-USB245M USB-to-parallel module connected to an HD44780-based 4x20-character LCD display. Connecting them just needs a few wires and is easy to lash up on a breadboard. The only other components needed are a couple of resistors to set the LCD contrast and backlight brightness; add another resistor and a transistor and you can switch the backlight on and off under software control.
The DLP-USB245M module is a small board with a USB device connector, an FTDI FT245BM chip, an EEPROM and a few passive components in a 24-pin DIL form-factor. It supports USB 1.1. It's available directly from FTDI, from DLP, or elsewhere; mine cost me £22.33 including VAT and postage. Other companies have similar modules that use the same chip and could probably be used here with few changes. I know nothing about modules with different chips.
I suggest first experimenting with the DLP-USB245M module by itself to get the first bit of the software working. You need to connect pins 3, 10, 11 and 12 together so that it powers itself from the USB bus; the others can be left unconnected. See the module documentation for details. On connecting it to a free USB port on the host system you should find it in /proc/bus/usb/devices probably with its default vendor and product IDs.
Note that you do NOT want the ftdi_sio kernel module. I believe that this module makes the chip appear as a serial device, e.g. /dev/ttyUSB0. We don't want that; instead we'll be accessing it at a lower level via libusb. You'll probably find that ftdi_sio.ko is loaded automatically, in which case you should modprobe -r it and make sure that it doesn't reappear before you've had a chance to change the ID codes, as described below.
At this point you need to install libusb and libftdi, if you don't already have them. You'll also need ftdi-eeprom temporarily. These are all available as Debian packages. The versions in stable work fine but newer ones are available, and in particular the newer version of ftdi-eeprom is supposed to have better error checking and reporting. This could be worth having as the version I had was remarkably unhelpful when I got the command-line syntax wrong.
The DLP-USB245M module has a small EEPROM on its underside which stores a vendor and product ID and other USB descriptor information. There does not seem to be a standardised way for experimenters to select USB vendor and product IDs, in the style of 192.168 IP addresses. (Please correct me if I'm wrong about this. I'm also quite suprised that they have chosen only 16 bits for the vendor ID! We'll have run out of them in a few years I reckon.) I have chosen the random vendor ID EE17 and product ID 0001. Feel free to use the same values, or choose your own. Apparently FTDI will allocate you one of their product IDs if you're building a product using the chip.
The EEPROM can be written using the ftdi-eeprom utility. A suitable configuration file is in eeprom/slugterm.conf. It should just be a case of running ftdi_eeprom --erase-eeprom slugterm.conf; ftdi_eeprom --flash-eeprom slugterm.conf.
Having run ftdi-eeprom you'll need to unplug the USB lead. I found that it may have been necessary to dischange the capacitor on the module by putting a resistor accross the supply for a moment and/or remove it from the breadboard in order for it to properly reset, but I can't be sure about that. On reconnecting it it should be visible in /proc/bus/usb/devices with the new vendor and product IDs.
My Ftdi class is a C++ wrapper around part of the libftdi library functionality, which in turn sits on top of libusb. The DLP-USB245M is used in what they call "bitbang" mode, which means that each of the 8 I/O signals can be programmed as an input or an output (we only use outputs) and a sequence of bitpatterns is applied at a rate determined by a clock generator within the chip. The last pattern remains on the output until another sequence is sent. If you want to use class Ftdi in your own application note that you need to construct it with vendor and product IDs, a bitmask to define inputs and outputs and a pattern application rate (only certain rates are valid, see the datasheet). You can then send patterns using the write() method. You could try some code like this to see if your module is functioning correctly; connect an LED to an output pin (via a suitable resistor) to see the effect:
// Example use of Ftdi

#include "Ftdi.hh"

#include <unistd.h>


int main(int argc, char* argv[])
{
  Ftdi ftdi(0xEE17, 0x0001, 184, 0xFF);
  while(1) {
    ftdi.write(0xFF);
    sleep(1);
    ftdi.write(0);
    sleep(1);
  }
}
Most character LCD modules have a standard interface and controller chip compatible with the HD44780. The interface can be used in 4 or 8-bit mode; we use 4-bit mode since we only have 8 I/Os from the DLP-USB245M and some of them are needed to drive control signals. The interconnection pattern that I've used is shown in the schematic below.
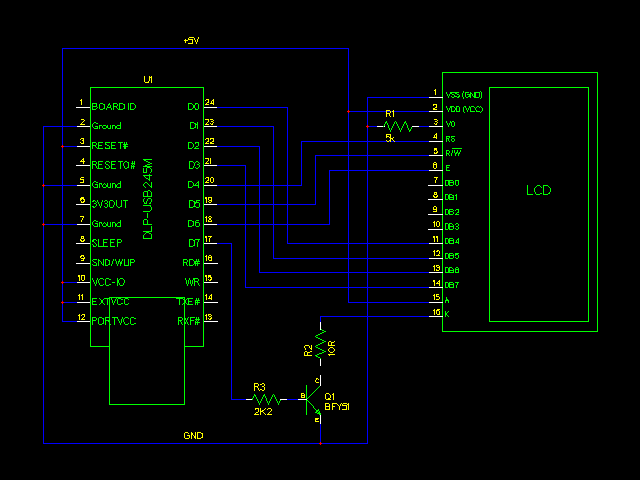
You can find the gschem source files for this schematic in the docs directory of the source distribution.
As well as the control signals connected to the DLP-USB245M you need to connect up power and ground, and inputs to control the LCD contrast and any backlighting. The details may vary between modules. In my case I found that connecting the contrast input to ground via a 5k resistor (R1) gives a good display. You might like to fit a variable resistor. My backlight claims to need 375mA; this is high enough that you need to think about the USB power issues and describe it in the DLP-USB245M's EEPROM. With lower currents, e.g. 100mA, the backlight is still quite useful.
For a permanent backlight just connect it to the supply with a suitable resistor (about 5 to 10 Ω, perhaps). Alternatively you can use an I/O signal to switch it on and off, as shown in the schematic. I've used an old-fashioned BFY51.
Some modules have electroluminescent backlighting, which requires a more complex circuit to generate a high-voltage supply, or may require a negative supply for the LCD driver. Apparently different modules may have their pins in different orders.
Different modules have different character sets. Mine - bought cheaply on Ebay - has a JIS X 0201 Japanese character set (A00 in the HD44780 datasheet). If you care about this - for example, if you need accented characters - check carefully what you are buying. I have written a simple conversion function, latin1_to_hd44780A00(), that maps those latin1 characters that my display has to the correct codes and the others to a solid block. These displays also have 8 user-defined characters and I use those for two missing punctuation characters (~ and \) and for improved versions of six lower-case letters with descenders: f, g, j, p, q and y. (Although the character cell is 5 pixels wide by 7 high, in my version the bottom row is never used by the built-in characters leaving it exclusively for the cursor. Redesigning these descending characters to use this row makes them look much better.)
The UsbLcd class provides an interface to the module using the lower-level Ftdi class. Its constructor takes USB vendor and product IDs which are used to construct the Ftdi object. During initialisation it also programs the user-defined characters described above. Once initialised you can control the display by writing characters, moving the cursor, clearing the screen and so on. The UsbLcd's methods should make sense if you look at the command descriptions in the HD44780 datasheet. Note that the write_at function is optimised to avoid an unnecessary cursor move if you write to the character already at the cursor position.
Here's a simple example of using the UsbLcd class:
// Example use of UsbLcd

#include "UsbLcd.hh"

int main(int argc, char* argv[])
{
  UsbLcd lcd(0xEE17, 0x0001);
  lcd.write_at(0,0,"Hello world");
}
If your display has a different size than 4x20 you'll need to adapt UsbLcd. It should be straightforward in most cases; you'll need to update the set_pos() method to describe the display memory map for your device.
The remaining piece of the jigsaw is ROTE, a library for terminal emulation. It is now available in Debian.
ROTE calls forkpty(), which creates a pseudo-terminal and forks a new process that runs on its slave side. ROTE manages the master side of the pseudo-terminal: you send it keyboard input which it passes to the slave process; it receives output from the slave process and updates its display data; you read the display data. It is not threaded and needs periodic update calls to function.
My Terminal class wraps ROTE in a way that allows a dedicated thread to do the updates so that the main program needn't worry about them. Its write method sends keyboard input, and the onChange constructor parameter supplies a callback function that's invoked when the display has changed. Here's an example of how it can be used:
// Example use of Terminal

#include "Terminal.hh"

#include <boost/thread/thread.hpp>
#include <boost/bind.hpp>
#include <iostream>

using namespace std;


static Terminal* t;

void screen_changed(void)
{
  cout << "Screen changed.  Character (0,0) = " << t->cell(0,0).ch << "\n";
}

int main(int argc, char* argv[])
{
  t = new Terminal (25, 80, "/bin/bash", screen_changed);
  boost::thread term_updater ( boost::bind(&Terminal::run,t) );
  t->write("ls\n");
  sleep(10);
}
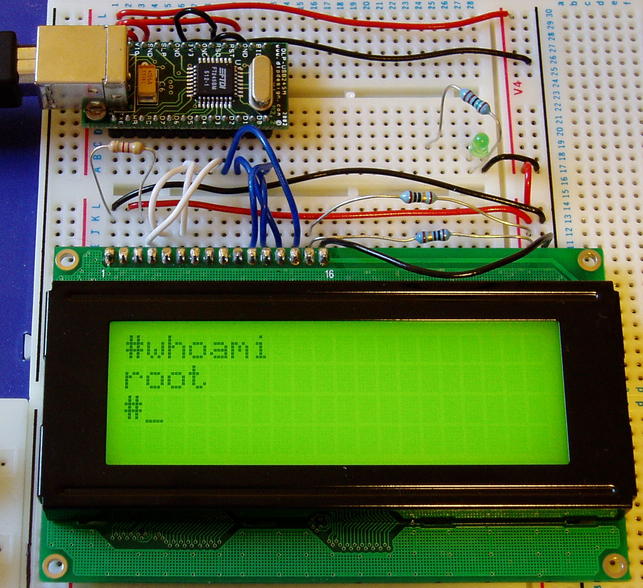
Class SlugTerm joins all of this together. A UsbKeyboard object's onKeypress callback is connected to a Terminal's write() method, and the terminal's onChange callback is connected to a UsbLcd's write() method. Since LCD writes are relatively slow it keeps track of the old display contents and only sends those characters that have actually changed.
Note that the system is decoupled: the slave process and the terminal emulation are not stalled by the slow display. If you run cat /usr/share/dict/words you'll probably see just a couple of snapshots of the terminal contents.
SlugTerm also implements virtual terminals. It can be given any number of commands to run, and each will run in its own ROTE session. Function keys (no shift, alt or ctrl needed) select between them. You could easily change this behaviour if you wanted.
It also provides a screenblank, with a default timeout of 60 seconds. This is a parameter to the constructor.
So you can create a SlugTerm like this:
// Example use of SlugTerm

#include "SlugTerm.hh"
#include "UkKeyboardLayout.hh"

int main(int argc, char* argv[])
{
  SlugTerm::commands_t commands;
  commands.push_back("/bin/bash");
  commands.push_back("tr 'a-z' 'A-Z'");

  UkKeyboardLayout ukkeyboardlayout;
  SlugTerm slugterm("/dev/input/event0", ukkeyboardlayout,
                    0xEE17, 0x0001, commands);
  slugterm.run();
}
main.c contains a main program that creates and runs a SlugTerm based on the command-line parameters that you supply:
$ ./slugterm --help
Allowed options:
  --help                 : show help message
  -k [ --keyboard ] arg  : specify keyboard event source
  -v [ --lcd-vid ] arg   : LCD USB vendor ID
  -p [ --lcd-pid ] arg   : LCD USB product ID
  -c [ --commands ] arg  : command(s) to run in terminal

$ ./slugterm -k /dev/input/event0 -v EE17 -p 0001 -c /bin/bash -c "tr 'a-z' 'A-Z'"
I suggest putting a static display of what each virtual terminal is for on the first terminal; pressing F1 for help is something of a convention, I think.
For native compilation, assuming that you have all the prerequisites installed you may be able to build the slugterm executable by just running make. (If you just installed the four required files from libpbe, as suggested at the top of the page, you should first remove "-lpbe" from the Makefile.) For cross-compilation I suggest the following. (How to deal with things like rote-config in cross-compilation is not something I understand.)
$ make ROTE_CONFIG=/usr/arm-linux-gnu/local/bin/rote-config PKG_CONFIG_PATH=/usr/arm-linux-gnu/lib/pkgconfig/ CXX=arm-linux-gnu-g++ AR=arm-linux-gnu-ar
Note that by default /dev/input/event0 is only readable by root. Similarly, usbfs and hence libusb are accessible only to root. This should be fixed with suitable udev rules that change the permissions on these device files when they are hotplugged. I have not worked out exactly how this can be done.
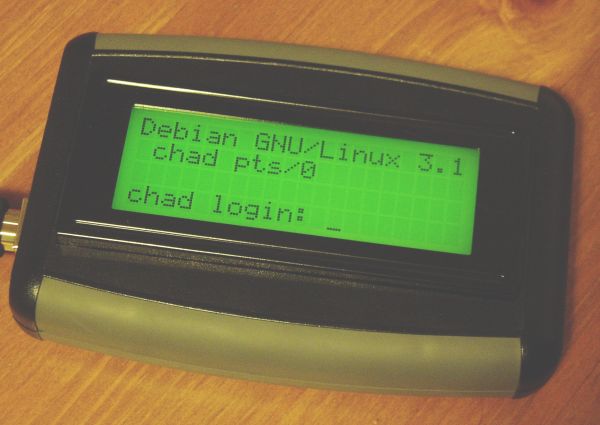
If you want to present a login prompt on your display I suggest the anygetty program from Anyterm. By the magic of svn externals this is included in the slugterm source distribution.
It should be possible to use udev / hotplug to make SlugTerm start automatically when the devices are connected. A complicating factor is that it needs to start when both the keyboard and the display are connected. You can also make it start when the system starts with an /etc/init.d/ script.
The display seems to be quite a lot slower on the Slug than on the PC, and I don't know why. I wonder if there is something wrong with the way I use usleep().
We could make the slug beep when the bell character is sent.
Processes on non-active virtual terminals could (optionally) be stopped.
My reason for building the terminal was to provide a print queue display. To make this useful I need a program that shows the print queue in a suitable format and lets you scroll up and down and cancel, pause and restart jobs. For this sort of control a few buttons alongside the screen would be sufficient, rather than a keyboard.
Do you have any ideas for other applications?
Andrew Robinson wrote to tell me that he has used some of this stuff to build a slug-powered jukebox, pictured below: